collage

collage

Wednesday, December 31, 2014

2014 Recap

And so, on this last day of 2014 I decided a recap was necessary. Sometimes at this time of year I feel a bit down. I think it's the distance from family, the grey days and throwing in a little sickness never helps. But in an effort to remind myself of how much fun was had and how many things were accomplished in this tough year, I made some collages.

First up, cooking. 2014 became the year I learned to cook. Now by this I don't mean that I became some fabulous chef or something, what I learned how to do was meal plan and follow through. Granted there were days when we ate scrambled eggs for dinner but I still consider that a win, because I actually planned the basics and therefore HAD eggs in the house to cook! Of course this year I also did a lot of baking. I finally tried to make pate a choux, which was something I always assumed would be too difficult. YUM homemade cream puffs are tasty! I also deem this "year of the bundt cake"as I finally got myself a bundt pan! The return of the pizzelle also made this Christmas season a little tastier and I'm so happy to finally have gotten a new pizzelle iron!


Most cooked new dish of the year: Beef and Broccoli/ Crock Pot Yogurt
Biggest fail of the year: Modern Beef Bourgiugnon 


Next up is sewing (with a little basic crafting thrown in)! I have branched out bit this year and have sewn things a bit out of my comfort zone! It still continues to be a fun and rewarding hobby and one that helps with my general restlessness!

reminder **don't pin pics of my child**
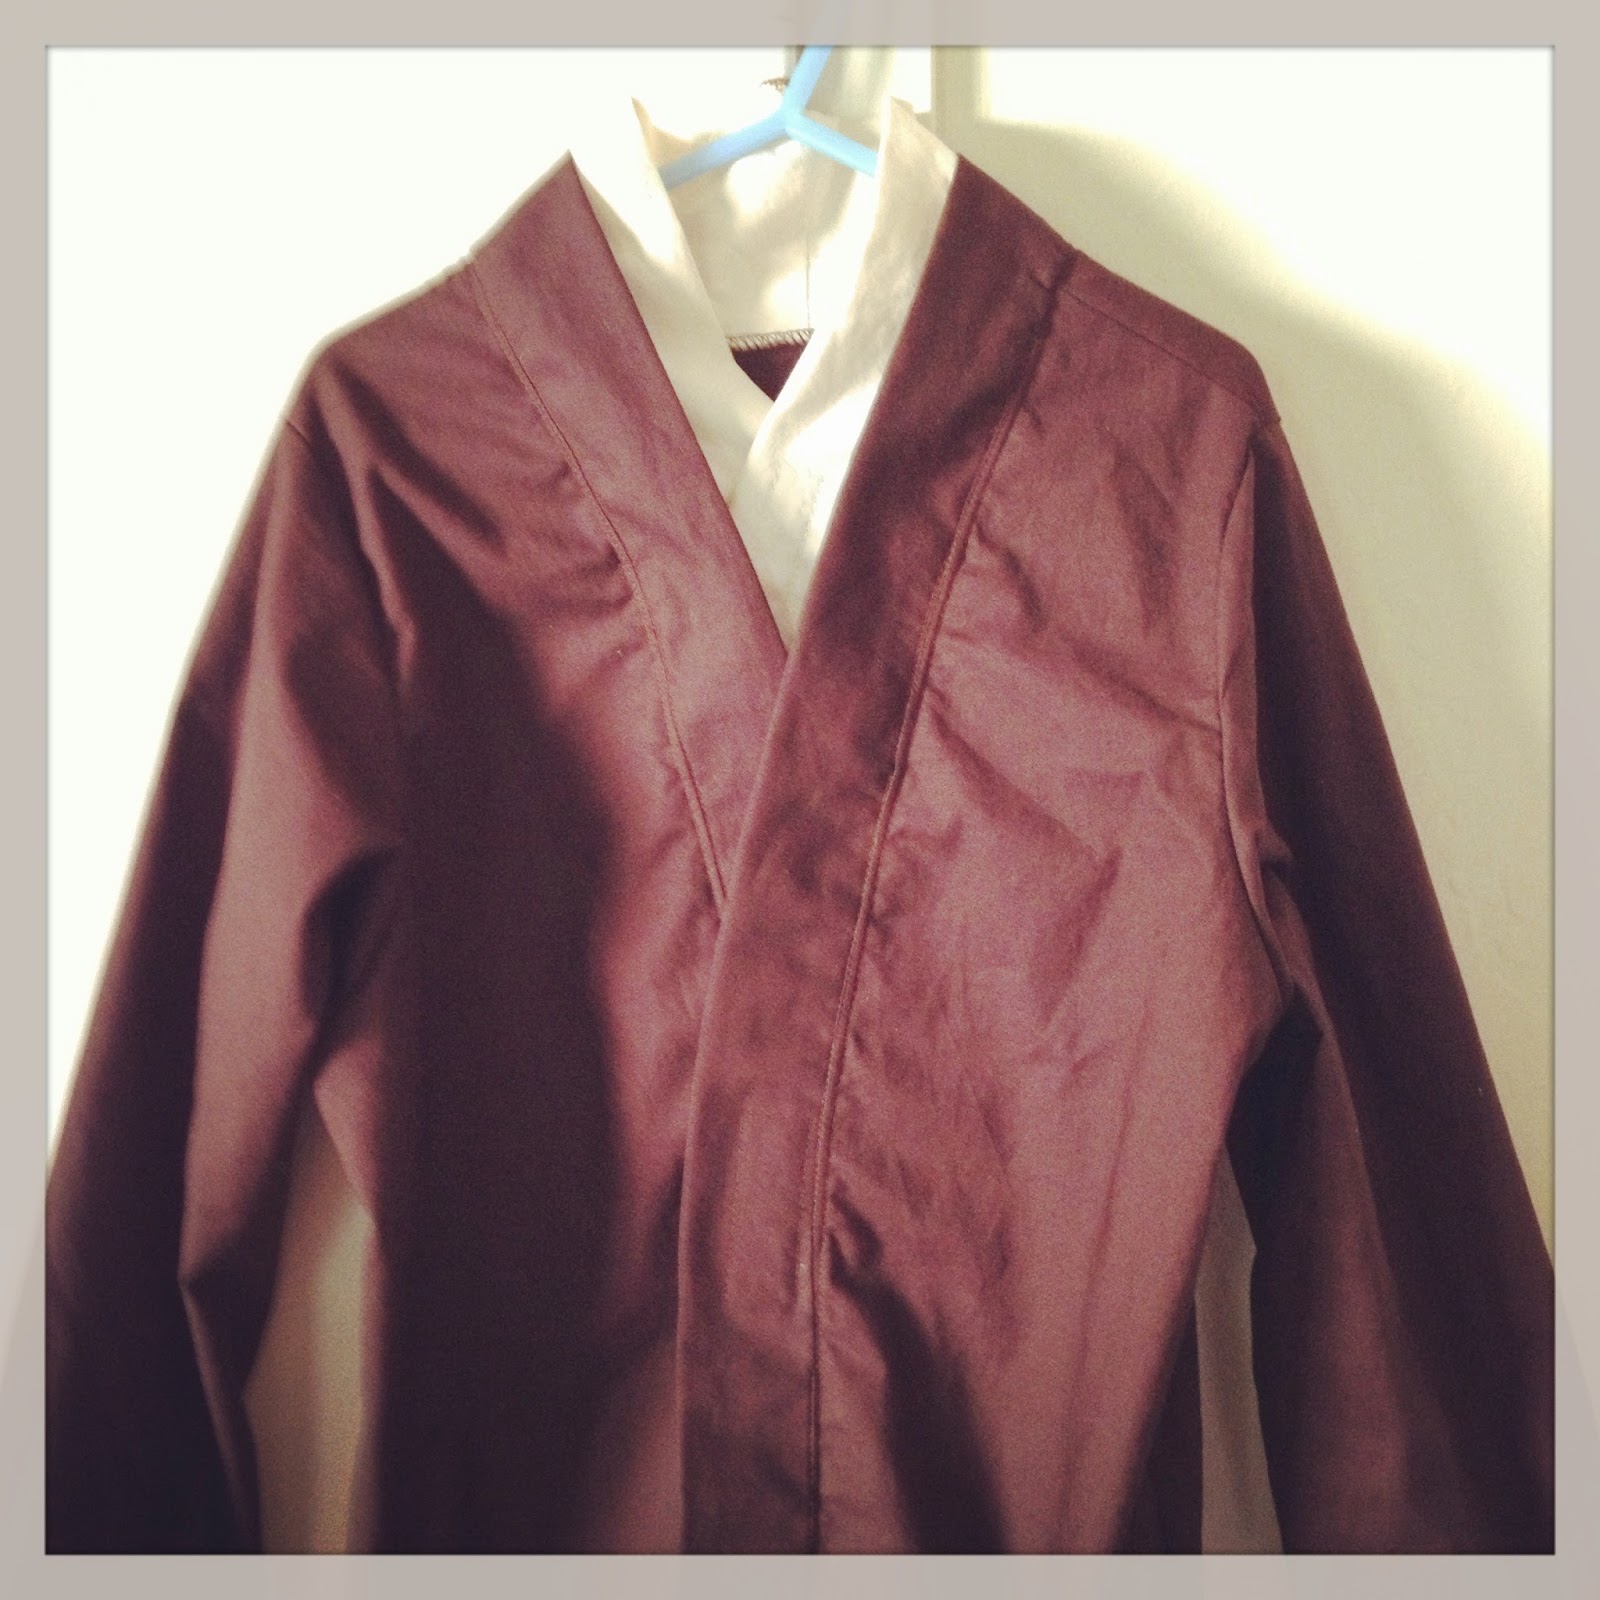
Biggest sewing accomplishments: Jeans/ Designing my own purse pattern/ P's Quilt/ Anakin Costume
Biggest fail: T-shirt sewing 

Rounding out the year is Knitting, my first crafting love! I was pretty prolific again this year and hope my knitting mojo remains intact through 2015 and for years to come.


Biggest Knitting Accomplishment: Burrard Cabled Cardigan. It was a labor of love!
Biggest knitting fail: Inland Cardigan (too bulky, doesn't fit right, total MEH!!)
Most knit item of 2014: Socks! I knit at least 7 pairs this year!


2014 brought its challenges, that's for sure, but my friends, family and my crafting really helped me through all of it. When I feel restless to be "doing something" I remind myself that there was a LOT of fun this year, I mean c'mon I have the surfing scar on my knee to forever remind me that I checked Hawaii off my bucket list this year! 

Here's wishing you and yours a very happy, healthy 2015 in which you get to do all the things and spend time with all the people you love! Now I'm off to continue to KNIT ALL THE THINGS, after I clean under all the beds, can't start 2015 with dust bunnies!! 


Friday, November 21, 2014

The Sweater that started it all!

My mom was a very talented and prolific knitter. I don't really remember a time at home when she didn't have needles in her hands or some hand knit sweater on her back. She used to tell me how she knit through all of her college lectures and how she knit my dad a sweater while they were dating. We often wore mother daughter sweaters that itched like CRAZY and were almost always made of some sort of mohair blend in a strange 70's/80's brownish color way. The fact that there is no photographic evidence of this is odd to me but I'm sure that at the time I made a point of avoiding cameras while we were wearing them, after all they almost always had a puffed sleeve and being that I am very broad of shoulder means they didn't look that awesome on me!

This photo is a pretty good representation of a lot of my memories of her.  Knitting everything on long straight aluminum needles. And yes I had to take a photo of a photo because that's how old I am!!

These two are the only photos I could find of me wearing hand knit sweaters made by her. This seems insane in this day and age where there are a thousand photos of EVERYTHING, but that's the way things go. And can you see that to take the 'selfies' above I had to use a long cable attached to my camera on a tripod. A manual camera, with FILM in it. I don't think my son will ever really know what film is! But I digress. 

This sweater in particular is extremely special to me. I still have it tucked away in my cedar chest. My mom made it for me when I was a junior in High School. As you can see it's an incredibly intricate pattern. Even the background stitches over the ENTIRE sweater are basket weave! This is a 40" chest people, that's a lot of switching from knit to purl. The most insane part of all of this is that even though I lived with this woman I never saw her knit a single stitch of this sweater. It just appeared on my bed one day folded in all it's immaculately new glory. How she managed that I can not tell you. Nor can she tell me, since she passed away 20 years ago,  just a few years after this sweater was knit and those 'selfies' were taken. 

I'm pretty sure that I was drawn to really learn how to knit by some need to connect to her. I didn't learn for real until I was out of college and working for a children's publishing company. My mom had tried to teach me a million times but it ever really took. Then as a 28 year old working at my publishing job the call went out for test knitters for our new Knitting book. I told the editor that I was a knitting novice and that I hadn't held needles since I was 7 or so, but the magical thing was that when I picked them up again and started knitting, it clicked. Somewhere deep in my brain was the knowledge my mother had given me years ago. It was still there and I haven't put the needles down since that day! I feel connected to her whenever I knit and it almost feels like she's knitting with me. 

Fast forward to this  year. I kept wanting to knit a cable sweater that would remind me of her, but be one I could actually wear now. Somehow that 40" chest seems outrageously humongous now! How I ever wore it then is a mystery. Ahhh the early 90's when girls wore enough clothing for 3 people instead of barely enough for one. 

I purchased yarn and pattern for Burrard thinking it would fit the bill nicely. I cast on last JANUARY!!!!!!! and started knitting away. I got the sleeves done in no time. Then on to the back where I got stalled for a few weeks because I mis-crossed a cable and didn't have the bravery I needed to drop down those stitches to fix it. My best knitting friend P helped me get over my fear while she was visiting for Stitches West. Then I moved on to the fronts and halfway through the first one I bottomed out. It went in a bag for the entire summer while I happily knit socks and hats and other small mindless items. 

This Fall when I picked it back up I realized I was no longer intimidated by it. I could anticipate the cable crosses and I could sense when a mistake was about to happen before it happened. And then ***Poof*** it was finished! 


It still needs buttons and a serious photo shoot outside on a bright day since this color is impossible to photograph, but there it is. My 21st century rendition of the cabled sweater my mom made for me. I think putting it on will feel like a warm hug and I will pretend it's a hug from her. Thanks mom for teaching me that you can do wonderfully amazing things will a ball of string and a couple of sticks! 


Wednesday, October 29, 2014

Anakin "just before he turned to the dark side"

This is exactly what my son said when he asked to be Anakin for Halloween. He wanted to specifically be Anakin "just before he turned to the dark side". You know the leather wearing, brooding, nightmare having Anakin who has dark circles under his eyes… like this:


I did a little research which kept bringing me to Cosplay sites of adults making legit Jedi costumes. I searched for a ready-made pattern for a cloak or a robe or something to make it easier on me but the only child sized Jedi costume patterns I could find were only available on Ebay for outrageous sums of money. 

I decided to hack it… which means I had to have faith in my ability to just cobble together a costume from odd bits and pieces. I knew it would take me FOREVER to do this so in late August (yes I know I am insane) I went shopping for Fabric. I had decided to use Melly Sews Sleepy Robe pattern as a jumping off point for the Jedi Robe and that's where I began. I bought 4 yards of Kona Cotton in Espresso at Joann's with a 40% off coupon thinking it would be enough fabric for the robe, the under tunic and pants. HAHAHAHAHA.. when you are done laughing at me you can continue to read about my process. 

For the robe I lengthened the Sleepy Robe pattern so that it would touch the floor with a one inch hem. Then I widened the fronts by a couple of inches so I could sew in a few pleats to mimic the drape on a 'real' robe. I also widened the arms so that my son would be able to fit his hands into the opposite sleeve for that typical Jedi pose. BUT that said I didn't want them to have the foot plus of drape that the real robes have. I thought that for a 7 year old all that extra fabric would just get in the way. 

For the hood I traced the hood of a zip up sweatshirt and then lengthened it by about 4 inches, and added a couple inches to the depth. It ended up pretty perfect. Then I just cut a 4 inch band to be the edge band and basically sewed it onto the edges all the way around from the bottom of one side, around the hood down to the other side in exactly the same way you'd sew on quilt binding. It worked great to finish it all off with about a two inch finished band. 

Photos of my son are off limits for pinning! 

He was already pretty stoked and wore the cloak around the house a lot just like this. But I knew I had a million other pieces to make before it would be complete. 

The next big item was the tunic and under tunic. I knew I wanted them to be one piece but look like two. If he had to put too many pieces on to make the costume complete, I knew it would be no fun for him. I used the Sleepy Robe pattern again, but this time used the sleeves as is and cut it off to about mid thigh. I did add a bit of a wrap effect on the front by tracing a bit of a slope onto the fronts of the pattern. I did the same banding as on the robe. It looked great! But how to do the under tunic was a bit of a brain teaser. I ended up cutting up an old pillow case into about a 10" wide rectangle. I pressed it in half and surged the raw edges. Then I sewed the whole thing to the inside of the tunic so that the stitching was basically right in the ditch of the tunic banding. I didn't sew it completely down because I needed the under tunic to cross inside the tunic and the tunic to cross over it. Then I used two pieces of Velcro to hold them both closed. One on the beige fabric (the under tunic) and one on the brown fabric (the tunic). Done and done!


Next step was the leather tabards, which really really confused me for a while. Plus I was not looking forward to sewing the fake leather I had bought at Joann's. But after staring at it for about a month I just decided to go for it. I cut two strips 5 inches wide and 52 inches long. I top stitched around the entire thing to give it the look that it wasn't just a strip of fabric. Of course just these strips wouldn't stay on his shoulders no matter what. so I turned to velcro again. I sewed a strip onto each shoulder of the tunic and then one onto the center of each tabard strip. That worked great. They stayed on, gave him the look of a manly shoulder and made it so he could put the tabards and the tunic on at the same time. 

In my mind one of the most important pieces of the costume was going to the belt/obi combo. Every Jedi wears one and they look like they are about 3-4 pieces each. Again, we are talking about a costume for a 7 year old here and ease of getting into and out of the costume had to trump authenticity to me. I made the obi, wide belt, and skinny belt all one piece by sewing them all onto each other. 


I sewed a little pouch on there that closes with a snap and I think it gives the whole belt a pretty authentic look. It just closes in the back with a long strip of .. you guessed it… velcro!

For boots I was torn. I didn't want him to have this awesome costume and then just put on his sneakers with it and I didn't want to make cheesy boot covers because I feel like they often SCREAM HOMEMADE!!! But I also didn't want to spend big bucks on authentic looking boots. I opted to do a little spending and a little making. I bought him black rain boots which he needed anyways and then I made a pleather covering for the front that mimics the Anakin boots this place sells for adults. I pleated the pleather, cut it to a basic shape and then again used velcro to secure it to the boots and his legs. I also sewed on a piece of clear elastic that goes over the sole of the boot to keep them from riding up too high. 

don't pin images of my son!

Don't pin images of my son!


This was the first time I have ever created something this detailed without a pattern. I knew what I wanted it to look like and I took my time working on the details. It is nowhere near perfect but my son was thrilled with it and was super excited when he was 'awarded' his Jedi Knight saber!

Happy Halloween and May the Force be with you! 


Sunday, October 19, 2014

Bundt

Two posts in one week? WHAAAT??? I have a confession to make… I recently became obsessed with owning a bundt pan. OK I know that's not much of a confession, but it was kind of a kooky thing to have on your mind all the time for weeks.

Back before the boy I worked at an AWESOME place. It was a children's publishing company and the people there all became like family for me since I was living 3,000 miles away from my actual family. Every so often (at least a few times a year) we would have a big potluck luncheon with all this amazing food. I was always super excited and hopeful that one of my coworkers would bring her famous sour cream coffee bundt cake! I swear I got the recipe from her a thousand and a half times but since I was too cheap, ummm I mean frugal, to buy a bundt pan I never made it and the recipe disappeared.

Fast forward 10+ years and the new King Arthur Flour catalog showed up in my mailbox with the cover showing every type of bundt cake you could ever make. I'm still frugal.. maybe even more so since now I'm a stay at home mom still and we live in what often feels like THE MOST EXPENSIVE PLACE ON EARTH! I could not justify spending $40 on a pan to bake a pretty cake, I mean how often was I actually going to use this thing? So I kept trying to put it off but really I just wanted to pop it all in my online cart at KAF and make bundt cakes every day.

And so it was that on a search for rain boots for my son I found a Farberware Bundt pan at a discount retailer for $6.99! It's not as heavy and detailed as the Nordicware ones but it gets good reviews and my first banana bundt cake came out gorgeous!  Today I searched the Internet for a sour cream coffee cake that might be similar and came across this one! I used my homemade vanilla yogurt in place of sour cream and my bundt pan is a 10 " I think so the cake is not as tall.


I may need to ease up on the amount of baking spray I use since the top of the cake has this weird honeycomb texture. And you can see how simple the detail on this pan is. Everything is much more rounded than on a more expensive and heavier pan but I'm OK with that. 


I also added a simple powered sugar glaze to the top of the cake and may have eaten two pieces before I could photograph it. Yay for obsessions satisfied!


Friday, October 17, 2014

Test Knitting

Over the summer I noticed a call for test knitters from one of my favorite indie yarn dyers Sweet Fiber! I immediately sent Melissa an email thinking nothing would come of it. I was super excited to receive her email asking that I be involved. Their yarn is amazing and if you haven't experienced it yet, please go to their website and buy some. I first discovered Sweet Fiber Yarns on Jane Richmond's blog sometime before Stitches West a couple of years ago. She had designed a hat pattern specifically for their yarn and the pattern was going to be available at Stitches. I went to their booth first thing and bought both pattern and yarn and I think it was only two days after Stitches closed that I cast on this awesome hat!

The pattern is Wellington and I knit it in Sweet Fiber Merino Twist Worsted. Please ignore the fact that I am sunburnt and sweaty in this photo it was around 90 degrees out as I was trying this on! 


I love this hat so much it made its way into my favorite family photo! 

The yarn is so fabulous I keep saying I'm going to save up my Stitches yarn budget to buy a sweater's quantity, but alas Melissa told me they won't be making it to Stitches this year. 

But this experience let me know I'd be hard pressed to find a better test knitting opportunity and so I was pleased to be able to test knit 3 of the 7 projects from their new E-Book Sweet Fiber Accessories

I knit three hats: Dockside, York and Bridgeway and the only thing that could have made the experience better would have been to knit them with Melissa's yarns. I only had Cascade 220 on hand and they are still fabulous! 

So I hope you will go check Sweet Fiber out. The patterns are incredibly intuitive and well written and I can tell you her yarn is sublime! 

I'll be back soon to share the labor of love that is my son's Halloween costume this year. I may have gone a bit overboard! Stay tuned!

Tuesday, August 5, 2014

It's been a busy month...

I always envision myself posting weekly or even more often than that. I often write up blog posts in my brain as I'm falling asleep at night, but then, when I wake they are gone and the busyness of the day takes over and another day, week, month goes by without a single post here in this space.

It's not that I've not been busy. In fact I've been knitting my little fingers off of late. I am test knitting a few hat patterns for one of my favorite indie yarn dyers sweet fiber! Melissa's designs are amazingly beautiful and even in test version her patterns are almost flawless. It's a pleasure to test knit them for her. My only wish is that I had a huge stash of her yarn so that I could knit each test piece in the yarn called for. Hopefully she will be at Stitches again this year so I can stock up.

Along with test knitting, I finished up a quick pair of socks. As I've mentioned before, I love to bring socks along when I travel. They are infinitely portable and often an easy somewhat mindless project that I can work on while chatting with the lovely folks I'm visiting. This year I knit almost an entire first sock on the plane from CA to NH!

This is Canon Hand Dyes William Merino Sock in color way Slytherin!!! It is amazing stuff!


I was a bit worried I'd run out of yarn! Ok I confess, I was secretly HOPING I'd run out of yarn so I could go yarn shopping in a state with no sales tax! In the end I restrained myself and slowed down on sock #2 and then broke into my "emergency" yarn.

This is Indigodragonfly Merino Single Lace in color way Beige! I think it's going to make one spectacular Trillian!

And so even though much of the last few weeks was spent like this:


and this:


and this:


It's back to reality now with school about to start in 13!!!!! days! I hope to add more fun 'makes' to this place soon! 


Monday, June 30, 2014

Adventures in sewing with knits!

I've been trying to learn how to sew with knits for a while now. I've had quite a few complete disasters which is totally disheartening, especially since that type of thing never really happened when I learned to sew with wovens.

I've bought and cut up and subsequently thrown away quite a few yards of knit fabric. Always hoping  that 'this time' it will work!!! Sadly the only thing I've successfully created was this:


This fun reversible double knit was supposed to become a T for me, but all that was salvageable after I messed it up was enough to make these tiny leggings. 

The one good thing to come out of this mess up was that I had time to learn how to use the serger I have been holding on to for a friend and also the best settings on my machine for the double needle. The tiny hems on these pants were pretty easy and aren't puckering at all. 

And so when Crafterhours announced her Friday Fiver was the Union St Tee by Hey June, I pounced. I bought the pattern thinking the bits of knit I had leftover from my latest disaster would be enough to try a first one.

I immediately printed the pattern and tiled it up only to find I was missing a vital page in the PDF. SO instead of sewing that first day I went in search of cheap knits to cut up. I found a $3 men's XXL T-shirt at target and when I received the corrected pattern the next day, I proceeded to cut it up. Based on the measurements in the pattern I cut out a small. I decided to start with the scoop neck with the wide neck band and got to work. About an hour and a little swearing later I had this:


It's a totally wearable T-shirt. Granted I cheated a bit and kept the original sleeve and bottom hem when I cut up the shirt, it made it a little easier and less daunting for a first try. Being cut from the stripe, the neckband looks a little weird since the white is right at the edge, but hey for $3 I'll call it a win. I almost even got the stripes to line up on the sides. 

Try two, although wearable was less successful in my mind. But mostly that is my fault for choosing this fabric and for my finishing. 


This is a cotton knit from Joann's. It's soft and I made another pair of those tiny leggings with it a while back, but for a T-shirt for me it's a bit heavy. No drape at all. Plus I was lazy or not thinking or whatever the reason, but I used white thread in my double needle for the hems and it doesn't look great. not only does it scream 'handmade' but it makes it painfully obvious that I am still learning  how to sew a straight line on knit fabric. Oh well, I have worn and washed it a couple of times and I don't think anyone else really sees the mistakes. 

And so I feel excited to continue on my journey to sew the perfect T-shirt. This pattern comes with many other options for sleeve length and also a v-neck opening that I am excited to try. I have learned also that I should probably cut out an XS  next time as on both of the above T's I re-serged the side seams to take it in a touch and they are still looser than my usual T's. I'd love to be able to make all my own T's from now on. With my long torso I always find store bought T's to be a little bit on the short side and I'd love to not have to tug at my hems every day! 

This set up worked well for sewing with knits, I only wish I had some real understanding of how this serger works so I could utilize it to it's potential. So far it's all been trial by error. Maybe that's the universe's way to nudging me to buy my own serger… 


Hold on a second… first things first… a new sewing machine gets first priority!! Happy Sewing!


Thursday, June 12, 2014

Adventures in sock knitting!

At Stitches I bought a skein of self striping sock yarn from Canon Hand Dyes. It's one of the nicest skeins of sock yarn I have ever purchased and so I wanted to be sure I did it justice. I want the stripes to remain perfect on the front of the socks and I want them to fit really really well.

In order to make sure those two things could happen I tested out techniques. First I did toe up socks with some splicing to keep the stripes consistent.


I just did a simple toe up sock starting with 10 stitches, increasing to 60 stitches. They are super soft and fun (Knit Picks why oh why are you discontinuing Felici, please tell us all that you are simply going to reintroduce it in some fantastic new form!), BUT they are a little too long. I just can't seem to get the knack of when to start the heel on a toe up sock. 

So enter the Shamrock Felici:


I did my usual 64 stitch sock on 2.75 mm needles and knit about an inch of gray 1x1 ribbing, then I found the start of that blue green color so I could make sure to get a full strip and started knitting. I only knit about 5 inches before putting in the waste yarn for the heel and then I continued on. SOOOOO EASY and mindless! The first sock I knit across 32 stitches and then turned and knit back so I had two rows of stitches to pull out. On the second sock I realized I didn't have to knit back, all I had to do was transfer the stitches back to the left needle and then start knitting with the green yarn again. Much easier to pull out the single row of stitches to open up the heel!

I had a lot of concern about how to  know when to start the toe decreases, but doing a little surfing I found a formula:

Total length of foot - two sets of normal toe decreases =  length of foot from waste yarn to start of decreases. For me this was  9"- 2(1.75)= 5.5" 

I wish I could remember where I found this so I could give this lovely lady credit for her formula, but I can't seem to find it. 


I just picked up the right leg of 32 stitches above the waste yarn and 32 below and then…ZIP… pulled out the waste yarn and voila!!!


It looks like such a mistake doesn't it and I was a bit worried. But then I realized even if I had messed it up completely since I didn't cut the green yarn I could have just started over!


I started knitting with the grey yarn again and after 3 rows plain, I began to knit a second toe on the heel. It looked super strange on the sock but I kept going, sewed up the two little holes that appeared on the top of the opening and the put it on! I was amazed at how perfectly this sock fits my foot! 


The major bonus is that in barely 8 days I went  from two skeins of sock yarn to one pair of awesome, perfectly fitted stripey socks! I love them. Since I knit them with a short cuff (which will be much more fitting for our warm winters here in CA) I was able to only use one skein of Knit Picks Felici and a party of the skein of grey yarn. YAY! 

Now that I know this technique works I can cast on this lovely yarn!!!


Sunday, June 8, 2014

Project bags galore!

I don't think I've ever posted about my project bag sewing. This is surprising, since I love to have little bags to carry around my knitting in. Years and years ago when I very first started sewing seriously, by that I mean things other than square baby blankets, I saw a Yarn Pop knitting bag somewhere.  I thought they were awesome and talked endlessly about them, but was not willing to spend the $20 to buy one of my own. At that point in time I still stored all my in progress knitting in clear plastic zipper bags! I even emailed my step mother a link to them,  secretly hoping she'd just make me one! Instead, she lent me a copy of  Sew What! Bags and assured me I would be able to insert a zipper in a small tote bag. This was the "teach a man to fish" approach, but I was not convinced and it took me a while to actually try because I was afraid to completely mess it up.
Originally I was going to make a bag with a buttonhole where the yarn pop bags have the grommet but in the months between coveting it and making my own, I realized I just wanted a simple zipper pouch that the project could be completely tucked into when not knitting on it. I guess I still don't get why you would want the working yarn to come through that grommet, and what do you do with the project when you aren't working on it? Do you have to tuck the whole thing into ANOTHER bag? Not for me.
One afternoon while my son watched Diego on the bed next to my sewing table I gave it a real try. I had collected my supplies, which were fat quarters from Joann's and a cheap zipper. I was amazed when it actually worked and I had this perfect project bag in about an hour.


The bag still gets a lot of use and is perfect for toting around an in progress sock or hat project. It really only fits one skein of yarn and the pattern, which is perfect for me. I love that it's lined and love that I found a zipper the exact shade of blue to match the flowers on the inside! 


I became a bag making machine, and made many more soon after that, a number of which I have given as gifts to fellow knitters.


As my sewing abilities improved I went in search of more interesting patterns. I began seeing Noodle-head's open wide zipper pouches EVERYWHERE in blog land. I made a bunch in different sizes. I like that they stand up on their own so you can sit a yarn cake squarely in the bottom and the yarn just flows right out! The smallest size one has become my tool kit and holds everything I need and then some. 


Soon after making those zipper pouches I started seeing the drawstring project bags all over the place. I made this gravity defying one first. OOPS I guess I'm still no expert if I can sew bunting completely upside down and not notice until the ENTIRE pouch is complete. I was so embarrassed to have this with me at Stitches this year that after seeing an entire booth of self "locking" drawstring pouches there I was inspired to try my hand at some new ones. 


Using ribbon to make the drawstring channel and then two drawstrings is the magic to the self "locking" part. This one is my favorite! I love the bicycles and that it's lined with denim for more structure. It is a perfect size for a slightly larger project like a child's sweater. And once I'd made one larger enough for a child's sweater I knew I needed one to hold my Burrard Cardigan and ALL the yarn and pattern stuff for it. So I made this one!


It is pretty big. I used 4 fat quarters to make it and didn't trim them at all. Since I don't usually take sweater projects on the go I wanted something to store the whole shebang in the house. This currently has ALL the yarn, the finished back and sleeves, the in progress fronts and the clipboard with pattern attached. It sits by my knitting chair and looks all neat and tidy! I love this fabric and really wish Joann's had it on a bolt, I've only seen it in fat quarters. 


The next logical step for my sewing skills seemed to be the ever prevalent in blog land, box tote. I mashed together a few different tutorials to make this one and it has become my go-to sock tote! I love the structure of it and the fact that it is compact and easy to carry.  It is perfect to hold a yarn cake and the pattern needed for any socks. It currently has two skeins of yarn in it since I'm doing a contrasting heal/toe on these self striping socks. 


Who knew I could blab on about project bags for so very long. I guess I'm a bit obsessed. Anyhow if you have a sewing machine and can sew even a vaguely straight line, don't purchase a project bag! Go make your own. Then you can choose fabric to match your unique personality! I think I have to go to my local fabric store now, and buy some Echino before they run out of it AGAIN! I think I need to make a few more box totes!!!